How to build a chicken yard, Part 1
Kevin Felts 07.09.13

Are you thinking about getting some chickens? If so, how much thought have you put into your chicken yard?
Some of the most important considerations for a chicken yard involve dimensions: how many square feet each chicken needs, how many chickens you want to house, and how much room do you need for growth. For my chicken yard I came up with 75 feet long and 30 feet wide.
Dimensions
My chicken yard is sitting between a driveway that leads to a garden area, an oak tree I do not want to cut down, and a creek. The width of the chicken yard could be no wider than around 30, or maybe 35 feet at the widest. As for length, the chicken yard could have been up to 100 feet long. But at 100 feet the yard would have been getting close to the garden area. In the end, I decided to go with a 75 foot long yard that is 30 feet wide, which provides 2,250 square feet.
If chickens do not have enough room then they start pecking at each other. The pecking promotes aggression, injuries, and infection, and in some cases the infections lead to death. Once a chicken develops an injury that bleeds, other chickens will peck at the wound. The wound is then unable to heal, if it gets infected then the chicken dies from infection.
So A general rule of thumb is each chicken needs at least 10 square feet in the yard, and my personal goal is to be able to raise at least 100 chickens comfortably. So 2,250 square feet will provide 100 chickens with 22.5 square feet for each chicken.
Room for growth
My goal is to have on average around 50 – 75 chickens. But with 100 chickens having 22.5 square feet each, this leaves a lot of room for growth.
Something I thought about doing is having enough room to raise 30 – 50 meat chickens in the spring, then butcher them before the heat of the summer sets in. If my wife and I can put at least 30 – 40 chickens in the freezer, then that would supply us with enough chicken meat for a year.
Another thought is that rather than raising meat chickens, I could raise heritage chicken breeds then butcher them as they are needed.
Construction

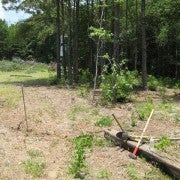
I started my chicken yard by using 3 foot sections of 3/4 inch round bar to stake out the corners. I measured the length, width and diagonal of the space to make sure the dimensions were correct.
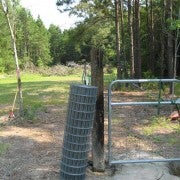
For corner post I decided to use crossties. A local hardware store just happens to sell used crossties for $10 each.
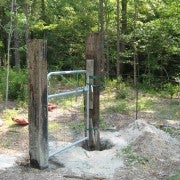
A shovel was used to break the ground, a machete and chainsaw to cut the tree roots, and post hole digger to dig a hole about 3 feet deep.
I dropped a few rocks about 1/2 the size of a fist into the bottom of each hole before placing a crosstie in. I then poured rocks around the base of the crosstie.
After the rocks, I poured two bags of quickcrete into the hole, and then I poured a five gallon bucket of water on top of the quickcrete. The mixture was stirred by round bar and by hand.
I used a four-foot level to level the corner post.
(If needed, you can drive stakes into the ground, then use a board going between the stake and cross tie to hold the post in place.)
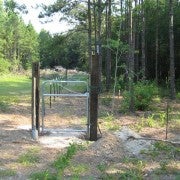
Quickcrete was allowed to dry for two days before the gate was installed.

The gate nearest the chicken coop is four feet wide and has a section of cattle panel tack welded along the tubing of the gate. If the cattle panel does not provide enough protection to keep predators out, then I will tack weld another section of wire panel to the gate.
2x4s were used as spacers between the bottom of the gate and the ground.
The gate hinges screw into the corner post with something that looks likes a lagbolt. Before the hinges were installed, a 3/8 inch pilot hole was drilled into the crosstie. I used a pipe wrench to screw the hinges into the crosstie.
Once the gate has been hung on the corner post we are ready to set the opposing post. Position the gate so that it is aligned with the fence, mark the ground where the other post is going, dig the hole for the other post.
Repeat with the rocks and quickcrete.
Place a level on the gate to make sure it is level.
To hold the second post in place while the quickcrete was drying, I used a couple of 2x4s as spacers between the gate and cross tie, and I used ratchet straps to hold the second post tight against the boards.
From the posts that were just set, decide which side of the wire you wish to run first. Then go to the other end of the fence and set the other corner post.
After the quickcrete has dried, stretch some string a few inches above the ground between the two corner posts. The string will act as a guide for setting the fence post. I used white trotline string between my corner posts, because it’s cheap and strong.

Have someone hold a tape measure on the corner post, then space the fence posts equally along the run.
For my chicken yard, I used six-foot-long T-posts — two feet in the ground and four feet above ground. I used a T-post driver to set the post to the desired depth and/or height.
Now it is just a matter of attaching the wire to the corner post and fence post. I used 48 inch tall 2×4 welded wire for this purpose.
Conclusion
That pretty much sums it up for now. In the next article we will be talking about setting the other corner post that the gates are not attached to, and about how to keep predators out of the chicken yard.