You Need a Bow String Loop
Bob McNally 08.18.15

When top tournament 3D archer and bowhunter Mike Mooney of Jacksonville, Florida, told me I needed to rig a string loop on my bow, I listened carefully.
“You’ll shoot tighter groups more consistently,” he said. “And you’ll save wear on the bow string serving when using a caliper release. Almost all 3D tournament shooters use loops, and those same shooters wouldn’t think of bowhunting without them.”
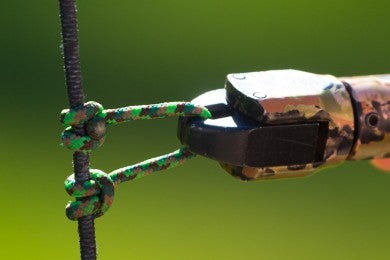
The “string loop” or “release rope” is simply a small piece of braided nylon cord that’s secured to the bow string just above and below the spot where an arrow is nocked. It’s best used with a caliper-style release aid, which according to the archery industry, is by far the most common method of shooting employed by today’s bowhunters–to the tune of something like 80 percent of archers.
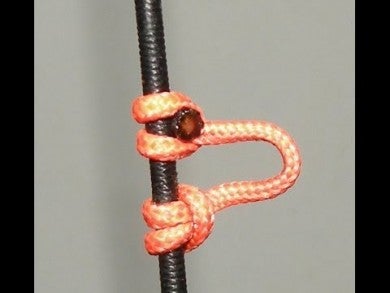
The primary value of a “string loop” is that it eliminates upward pressure associated with caliper releases against standard metal nocking points. This upward pressure and severe “pinching” effect at full draw, tends to make arrows fly erratically. This is a particular problem with short, fast compound bows that have an especially acute string angle at full draw when shot with a caliper release using only a standard nocking point.
Constant shooting with a caliper release aid also wears quickly on a bow string serving. And reserving a bow string is time-consuming and can get touchy, since new nocking points must be set, and that usually means the bow must be completely sighted in again. But a string loop eliminates bow string wear. When the “string loop” begins to fray, simply cut it off, and quickly tie on another one. Sighting in with the new “string loop” in usually fast, since you can easily mark exactly where to tie it on the bow string with a felt pen.
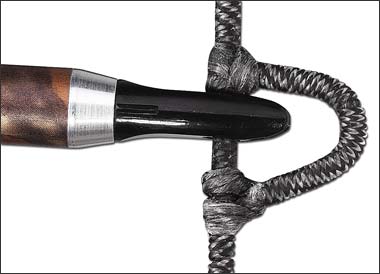
Another benefit of a “string loop” is something I learned the first time I tied one to my bow string. It was a hot new bow that “just fit” my draw length. At full draw I easily could max out the draw, a feeling I don’t like, though plenty of other archers do. Before learning about “string loops” I considered increasing the bow’s draw length about a half inch. But when I set up the “string loop,” I just made it a little longer than usual, measuring 1.25 inches from the bow string to the back of the loop. Simply by increasing the “string loop” I quickly increased the bow draw length.
Another benefit of a larger-then-usual “string loop” is that for hunting purposes, it’s very fast to attach my caliper release to the oversize loop. Most other “string loops” I’ve seen in use, and ones I’ve got on other bows, are quite small–just big enough for caliper jaws to fit in.
That can be problem when a walking elk suddenly shows without warning or a buck chases a doe by your stand. There’s no time to fumble around with a release trying to get ready to draw. A big “string loop” helps.
Setting up a “string loop” is easy. But for archers who are all-thumbs, it saves time to ask a friend who knows how to help set it up or check in at an archery pro shop.
“String loop” material can be purchased at archery shops and through mail order catalogs. But it’s normally easy to locate suitable cord locally. Some archers use parachute cord for making a “string loop,” and 2mm nylon cord found in camping supply stores works well. The best cord I’ve used comes from Venetian blinds. It’s tough, cheap, and just the right diameter.
The first step in installing a “string loop” is to locate the spot where an arrow should be nocked. This is done as usual, with an arrow placed on a bow rest, then snapped on the bow string. Slide the arrow to the approximate spot you believe it should be positioned (usually 1/8-inch above square). Use a felt pen and mark the bowstring above and below the arrow nock.
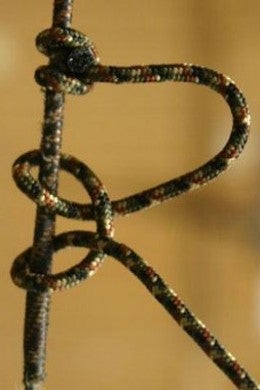
Remove the arrow, and tie one end of the nylon cord to the bowstring right on the felt pen mark, using a “reverse half hitch knot.” Using the same knot, tie the cord so it covers the other felt pen mark. Keep knots lose until you determine the length you desire the “string loop.” Nock an arrow, and wiggle the half hitch knots so the arrow nock is snug between the nylon. Then tighten the half hitch knots using needle-nose pliers, and trim the knots, leaving 1/4-inch tag ends.
Next, with a lighter burn the tag ends of the “reverse half hitch knots” so a “ball” of nylon is produced. This keeps the ends from slipping through the knots. Many archers also dab the nylon “ball” with a bit of epoxy–just in case.
Now hit the range and shoot a few arrows to get comfortable with the set-up. Paper tuning follows next, and if you learn the nocking point must be adjusted a tad high or low, spinning the “string loop” along the bowstring serving is a snap–much easier than removing an old metal nocking point, pinching another one on, then paper tuning again, and again, and again.
In adjusting the “string loop” up or down, be sure to turn both knots simultaneously, to keep the same gap you set up for your snug-fitting arrow nocks. Once you’ve paper tuned so you’re satisfied the “string loop” is perfectly positioned on the bow string, lock the “string loop” in place by serving above the top Half Hitch Knot with a bit of dental floss. Some bowmen simply crimp on a metal nock above the top knot to keep the “string loop” from moving–and it will move if it isn’t secured.
