Drill Your Own Shallow Well
Russ Chastain 05.08.18

There’s one thing we humans can’t go very long without, and that’s water. Whether the government has forced you to connect to a municipal water supply or you’re concerned that a lack of electrical power might prevent you from pumping water from your existing deep well, it’s certainly worthwhile to know how to create your own shallow well, should you ever need to.
I’m from Florida, where wells are not that complicated and many people have their own wells to supply water to their homes. In many, but not all, areas of Florida, groundwater can be found fairly close to the surface. This would be a great source of hand-pumped H2O in a pinch.
I recently ran across an article at Mother Earth News, in which Al Adams describes his experience designing and building “a do-it-myself shallow well.”
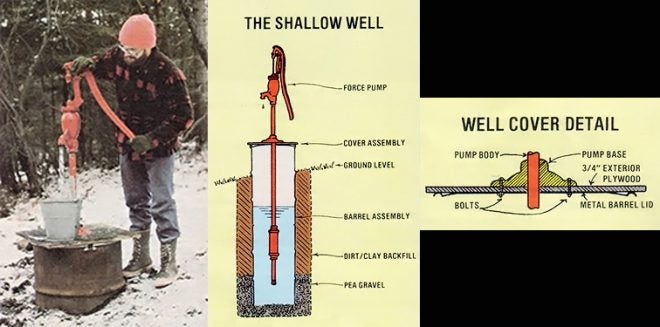
To begin the project, I dug a three-foot-square hole at a point where a natural spring (“seep” might be a more accurate term) was located. I was careful to position my pit back from, and a bit above, a nearby marshy area. (Ideally, a well hole should be dug in late summer, when the water table is at its lowest. At that season you’ll need to bail less while digging and can be reasonably sure of an adequate flow of water during the wetter parts of the year.) I was relieved to hit bedrock at a depth of 5 1/2 feet, since I would have had difficulty excavating deeper with hand tools.
Once the pick-and-shovel work was behind me, I obtained two 55-gallon drums (they had formerly held glue) with locking ring-sealed removable lids. A friend kindly volunteered the use of his oxyacetylene torch, and before long the bottoms of the two barrels were removed and I’d brazed the cylinders together end to end …producing a sturdy steel tube about two feet in diameter and six feet long.
He used a campfire to burn off the old glue and paint from the steel drums, and experienced something that would have ruined his day if he hadn’t been lucky during the torch-cutting process: intense burnoff of the glue residue.
Much to my surprise, a column of yellow flame was soon shooting some 15 feet into the air, accompanied by the earthquake—like rumble of a very violent draft. Within an hour the paint had been vaporized by the intense heat and—after waiting for the metal to cool—I wire-brushed the remaining residue from the metal and rolled the assembly down to the hole.
He next describes how he shoveled in some gravel to filter the water and made a mount for a hand-operated pitcher pump. After pumping out a bunch of mud, he chlorinated the well with bleach.
I also decided to chlorinate the water, to kill any bacteria that might have been introduced during the construction process. To do so, I mixed one quart of household bleach with an equal amount of water, making a solution capable of purifying 100 gallons of drinking liquid. The mixture was then dumped into the well and the system resealed with its locking ring and silicone caulk. I pumped until a strong smell of chlorine was evident at the hose outlet, then let the purifying chemical do its work overnight. On the following morning, I pumped the well out a few more times to remove all detectable traces of bleach. After that my low-cost shallow well was ready for use!
Here’s an addendum from the editors of that site:
Anyone duplicating Mr. Adams’s well might want to consider using only barrels — of heavy plastic or otherwise — that are approved for food storage. The author reports that his metal drums did eventually introduce some rust into the water, which forced him to install a filter. In addition, it’s best to have any new supply of water tested for purity if it’s to be used by humans, and to install a locking assembly on the lid to prevent curious children from opening the well and, perhaps, falling in.
This sounds like a reasonable way to approach the process of creating a shallow well. What do you think?