4 Marksmanship Fundamentals: Stance, Trigger Control, Breathing, Aiming
Travis Olander 10.17.23

As many new hunters sight in their first trophy buck, some are also pulling the trigger on a rifle, shotgun, or pistol as a novice. Each year, more Americans become first-time gun owners. As a new shooter, knowing the fundamentals of good marksmanship is nearly as important as mastering the four rules of firearm safety. Let’s go over what it takes to improve accuracy and control, ensuring you’ve got the best chance of bagging that 8-point tag. The four marksmanship fundamentals include shooting stance, aiming technique, breath control, and trigger squeeze. Let’s go over them in detail.
Firearm Safety & Education on AllOutdoor
- Teaching Others About Firearms – Retirement and Sticking to the Range
- Teaching Others About Firearms – Taking a Second Swing through Classes
- Teaching Others About Firearms – They Want To Shoot Their Personal Gun
- Teaching Others About Firearms – What to Do with a Malcontent or Rascal
Marksmanship Fundamentals #1: Proper Shooting Stance
Often, beginners are so focused on all the other aspects of shooting that they ignore step one: Obtaining a proper shooting stance. With a poor stance, recoil is poorly controlled. Shooters tend to “gorilla grip” their weapon, further reducing accuracy. But whether standing, kneeling, sitting, or laying prone, there’s always an optimal stance that improves recoil mitigation and accuracy.
Rifle/Shotgun Stance
Standing while is shooting is, for most beginners, the most difficult stance to achieve. There is no bench rest nor support provided by anything other than your core muscles and legs. Your arms are left to bare the weight of your long gun while also absorbing recoil impulses. But by following a few key best practices, you can dramatically improve your shooting stance while standing and gain confidence as a new shooter behind the trigger – no matter the caliber.
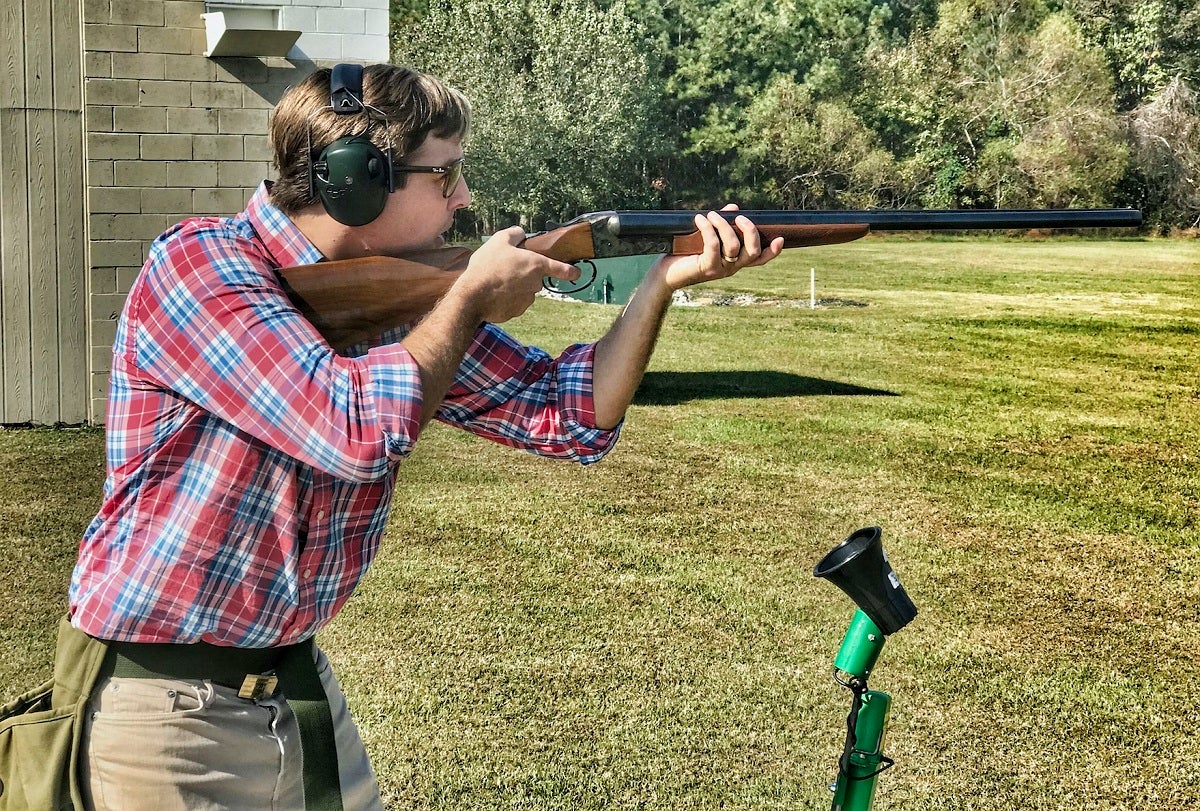
Tuck the stock. Beginners are typically timid when it comes to tucking a long gun. But by not pressing the stock firmly into the pectoral, you’ll wind up with high muzzle rise and a bruised chest. Don’t press the stock into the humeral head (that’s the tip of your shoulder), either. Keep the stock close to the center of the chest, directly underneath the clavicle.
Tuck the elbows down. A new shooter’s often caught because of the tendency to “chicken wing” the elbows – flaring the arms outward. Do as the shotgun shooter above illustrates: Points both elbows down at the ground, and keep them close to the chest.
Cheek weld. The cheek underneath your sighting eye should be pressed firmly against the stock of the rifle or shotgun. If your jawline is resting atop the stock, you’ll likely have a poor sight picture and you may suffer bruising on your face.
Feet placement. Feet should be spaced approximately shoulder width apart, with both toes facing the target. Both feet can be parallel, but placing the foot underneath the trigger hand slightly forward helps to encourage tucking the stock and elbows.
Lean forward. Simple! Lean. Forward. Stick with that foot-forward placement to encourage this, too.
Following the tips above will help you avoid some common mistakes when standing and shooting with a long gun:
The “lean back.” The lean-back tends to go hand-in-hand with not tucking the stock. Shooters try to literally lean backward and away from the long gun, inviting disaster by simply falling backward from recoil. Always lean forward.
Gorilla grip. If your knuckles are white, you’re gripping the gun too much. With a proper stance achieved, there’s no need to grasp any long gun like a monkey bar over a pit of lava. Relax the finger tips and wrists a bit. This will improve trigger squeeze (more on that later).
Pistol Stance
Obtaining a good shooting stance with a pistol is more difficult than doing so with a long gun. But by following these best practices, you’ll have your stance dialed in so you can focus on aim, control, and trigger squeeze.
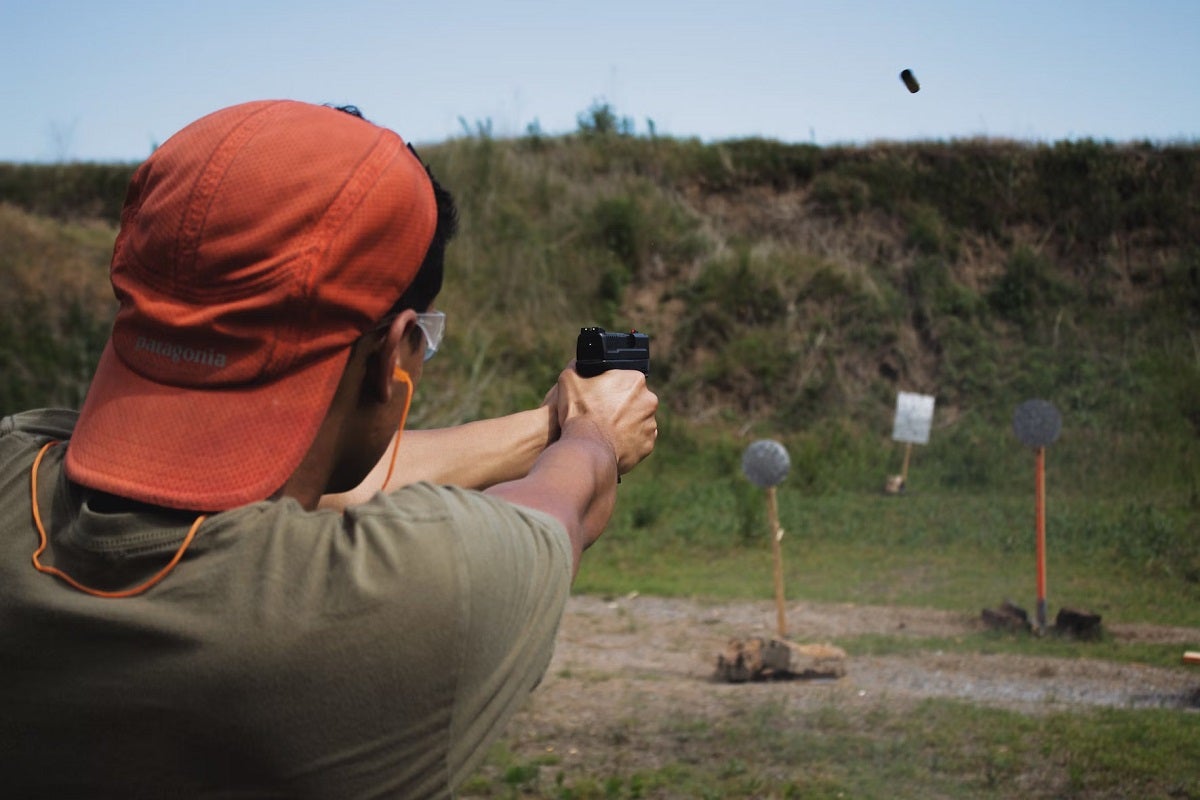
Feet spread, toes forward. A wide stance with feed spread is even more important in obtaining a good standing shooting stance with a pistol. Feet should be spaced slightly wider than shoulder width. As with long guns, feet can be parallel or staggered, with the foot underneath your main hand slightly forward. Point your toes at the target.
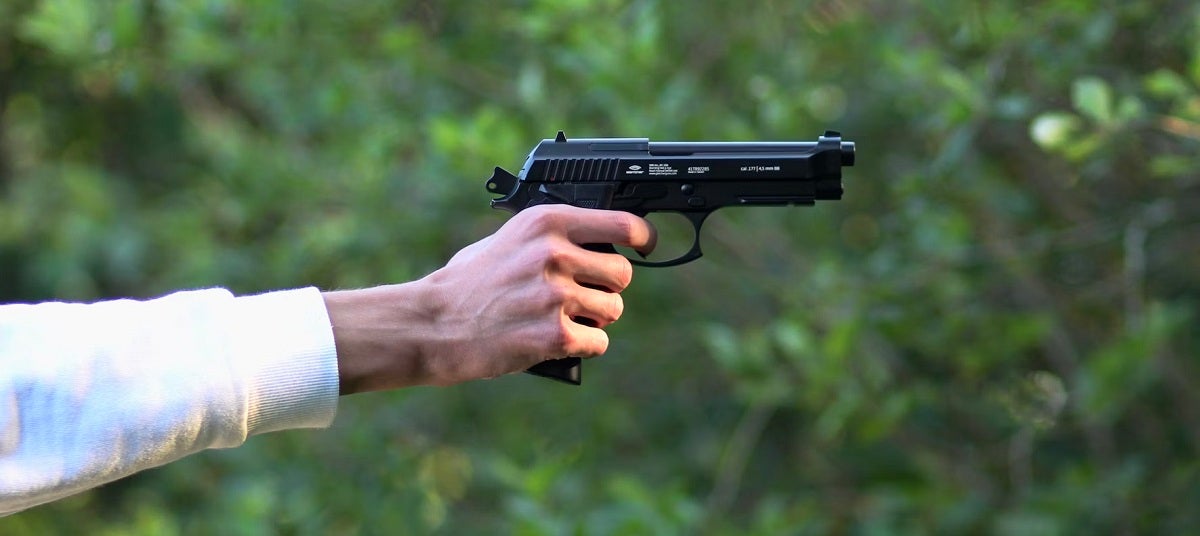
Proper two-handed grip. The trigger hand’s fingers should firmly wrap around the pistol grip, ensuring the webbing between the thumb and index finger is seated well below the slide. The off hand should cup the main hand, with the off hand’s fingers resting directly atop the main hand’s digits. The off hand thumb should rest firmly against the frame of the pistol, also well below the slide.
Arms forward, but not locked. Keep both arms extended forward, with elbows pointed approximately 30 degrees downward, but not bowed. Your arms should be nearly straight, but not locked.
Lean into it. As with long guns, a forward lean should be maintained while aiming downrange. This prevents the amateur “lean back” stance from introducing poor recoil control and accuracy.
It’s easy to make some mistakes while you’re focusing on all the aspects of a good pistol shooting stance. Avoid these common mistakes:
Gripping the pistol too high or low. To achieve greater control, new shooters often place their main hand high on the backstrap, which can cause slide bite — a common injury wherein the slide pinches the webbing of the hand. The webbing of your main hand should be tucked forward into the deepest part of the concave groove, or curve, molded into the backstrap.
Shoulders drooped. Droopy shoulders typically introduce weak arms, which affects grip, accuracy, and recoil control. Hunching your shoulders up can help tighten the core and promote proper positioning of both arms. It also facilitates a lean-forward stance, and it can help dial in good sight alignment.
Leaning back. The lean-back happens just as often with new handgun shooters — especially if the shooter is afraid of recoil and muzzle blast. Leaning back is certain to introduce poor performance, if not force a dangerous stance that could land you on your rear end with a negligent discharge close behind.
Marksmanship Fundamentals #2: Aiming
Even experienced marksman can probably learn a thing or two when it comes to proper aiming and sight alignment. Good aim involves more than just putting a bead on a target. Great aim requires constant control and relaxed focus. Follow these tips to improve your aim game:
Aim with both eyes open. All shooters, new and experienced, should take time to slow their breathing, focus on the target, and achieve a clear sight picture. But if you try to squeeze your non-sighting eye closed while aiming, your vision will fatigue.
At first, trying to achieve proper focus with both eyes open will seem difficult. But with regular practice, you’ll be able to subconsciously “void” the vision from your non-sighting eye and enjoy perfect clarity through your irons or optics without ever getting fatigued.
Focus on the front sight post. If you’re shooting with iron sights, after sighting your target, your focus should remain on the front sight post (optics aren’t applicable, here). The rear sight and the target itself should not be the primary focus when you’re pulling the trigger.
Keep your head up. New shooters often cant their head at an angle when aligning their front and rear sights, or when viewing the reticle in an optic. This can cause eye strain and neck pain, and it skews your perception of the target and its placement on the X and Y axes. Your head should remain as straight as possible — perfectly upright when firing pistols, and nearly upright with a proper cheek weld on a long gun stock.
Shooters often get trapped by these bad habits in the pursuit of good aim. Avoid these common mistakes:
No rear sight or target focus. Focusing on the rear sight or target will cause improper sight alignment, which means poor accuracy and inconsistent shot groups.
Don’t aim for too long. We said you should be patient and take your time sighting in your target — but don’t try to hold your stance and sight alignment for too long. You’ll wind up straining your grip and your vision. If you’re not able to dial in your aim in a reasonable amount of time, stand down. Take a breathe, shake it out, assess your target at the low-ready, and reset.
Don’t flinch. Your sighting eye should remain glued to the front sight post (or reticle) until the recoil from a round exiting the muzzle is interrupting your sight picture. New shooters tend to flinch at the end of the trigger squeeze and prematurely kill their aim.
Marksmanship Fundamentals #3: Breath Control
Breath control is the most overlooked component of good marksmanship. This writer’s personally witnessed plenty of “experienced” shooters — civilians and military personnel alike — resort to going to blue in the face by holding their lungs to achieve consistent shot groups.
Even if you can shoot “well enough” by holding your breath, you’re handicapping yourself. Good breathing behind the gun will improve accuracy. Period. Follow these best practices.
Take slow, deep breaths. Beginners should focus on conscious breath control. Take slow, measured breathes in between shots, and keep the number of breathes between each shot the same, every time.
This exercise in breathing speed and cadence helps to promote good pacing while you’re shooting. It’ll facilitate timing your shots consistently, without ever getting tense or fatigued.
Pull the trigger on the exhale. We naturally tense up when we inhale. It’s a reflex we simply can’t overcome. By squeezing the trigger only while exhaling, you’re forcing your body to remain calm. This alone can reduce the tendency to flinch and lose your sight picture prematurely.
Take at least one breath between shots. This exercise complements the consistency and cadence we mentioned above. As you build confidence and discipline with the other fundamentals of marksmanship, you can work on rapid fire – sending two or three rounds downrange between each breath – without losing your sense of pace.
It’s tough to mess this one up, but we’ll reiterate the one bad habit you must avoid: Don’t hold your breath.
Marksmanship Fundamentals #4: Trigger Squeeze
This is a common occurrence: You’re ready to send some rounds downrange. You focus on setting up a proper stance, getting a good grip, sighting in your target, taking a deep breath, focusing on your aim — and then you mash the trigger and pull the muzzle off target.
While practicing all the fundamentals of marksmanship, it’s easy to lose the discipline needed for a good trigger squeeze. As a new shooter, your nerves will get the better of you. Obtaining good trigger squeeze simply takes time. Exercise these best practices to get there:
Don’t anticipate. Anticipating the round igniting while squeezing the trigger is arguably the greatest barrier to accuracy that any marksman faces. Desensitizing yourself to the sound, recoil, and blast of live rounds exiting the muzzle requires time and repetition. Safely dry-firing your firearm can help, here (use a snap cap in the chamber).
Squeeze, don’t pull. If you’re pulling the trigger, you’re pulling the muzzle off the target. When shooters pull the trigger, they’re engaging in a rapid motion that causes poor accuracy. Squeezing the trigger requires a slow, steady pace.
Follow through. Like a golf swing, you should follow through with your trigger squeeze until the trigger bow bottoms out. Focusing on squeezing the trigger to its physical limit will help overcome the anticipation of the round’s ignition.
Use your finger pad. You may need to build up some strength in your digits to overcome a heavy trigger. You may feel encouraged to squeeze with the middle or base of your finger. But doing this will invariably pull your muzzle off target. Squeeze the trigger with the pad of your finger tip. This ensures you’re squeezing straight back, not left or right.
Now that you’re learned up on the fundamentals of marksmanship, check out our review of the best beginner handguns for new shooters.
