The Roundboy wood-fired oven
Major Pandemic 06.11.13

Building the Roundboy

The Roundboy assembly only took less than two hours; yes hours. The detailed directions make it simple and fast. The first steps are to lay the base plate down, place the 26 firebricks, place the front and rear internal oven pieces, and slide on the left and right sides to the internal chamber.
Up to this point we have not used any of the adhesive or caulk-based refractory mortar included with the kit. Next, load up the caulk-based mortar and lightly caulk the seams as directed, then place the stainless steel chimney and caulk it in place.
We also followed a tip which suggested lining the exterior of the internal oven with aluminum foil. We then placed the front and rear exterior panels, added a couple blobs of the included adhesive, slid on the side, poured in the insulation, and slipped on roof panels. Finishing up only required caulking the roofline seam with mortar and placing the chimney cap. To finish off the roof line, I just notched and cut the aluminum cap and slid it on the chimney and attached the chimney cover. Done in less than two hours!
Firing up the oven
As with any outdoor oven, you need to build up in a series of around six fires dead center with increasing in intensity to slowly to dry out the oven and prevent any pressure-induced cracking.
My main questions was what type of wood I should use for these and other fires? Based on my conversation with Karl, any dry wood can be used to initially season and fire the oven to temp before inserting aromatic hardwood for cooking. Karl suggested I cut up and use the shipping pallet, and that worked perfectly for seasoning the oven.
The oven is efficient and burns so hot that wood burns completely — I only have about a quart of ash from the first three firings. Hardwood may be the prefered cooking wood, but I have found through my cooking that cut up pallets do a perfect job of pre-heating the oven to temp. After the oven is pre-heated, I then add two or three hardwood quarters to maintain heat and add aromatics. I have cooked numerous cast iron covered dishes with just cut up pallet wood and you would never know the difference; of course, with open cooking like pizzas, the best flavor will be with hardwood.
The cook
The big question is when will you know the oven is ready? Once the fire starts up it will coat the inside of the oven with black soot, once the oven is at temp, around 800-1000 degrees, three quarters of the ceiling will turn white, cool to witness. I heat for another 15-20 minutes past just to make sure the oven has good heat dispersion and the floor gets hot. Ideally, you want the oven ceiling around 1000 degrees and the floor around 750, which takes a minimum of two hours if you are doing it right and not rushing the fire.
Outdoor ovens are very efficient once they get hot, and because of their mass they stay hot for a long time. After dozens of uses, I’ve found that twelve hours after the fire burns out, the oven will drop from 1000 degrees to around 150, plenty of time for cooking. If a little fire is maintained, the oven will stay hot and at BBQ smoker level, 200-220 degrees, requiring a small fire to maintain with the door barely cracked.
Some cooking tips
A preheated, uncovered cast iron skillet with an oiled, salted, peppered, and herbed whole split/butterflied chicken in the 400-500 degree range will deliver the most incredible crispy skin and tender chicken.
Don’t waste the heat in the huge interior. After you make pizza, let the fire die down a bit and pull out the embers with the pizza turner and slip in bread loaves, chicken, stew, roast or all three — pack it full.
Ultimately, you’ll find that outdoor ovens are much more versatile than something exclusively for pizza. In the midwest heat, it has been handy to fire up the Roundboy instead of heating up the house, so I may actually be saving a little energy in the process.
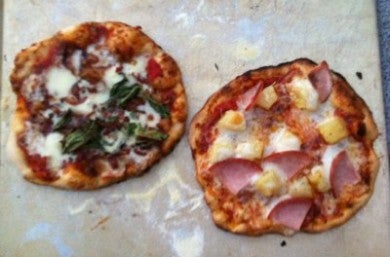
Always have a log or two of hardwood burning when making pizzas to maintain temp and get that nice bubbly brown crust. You need a pizza peel equal sized to your pizza and a small turning peel no wider than half the width of the mouth of your oven, so you can actually maneuver it.
The last fifteen seconds of finish “turbo” browning can be done by holding the pizza near the ceiling with the peel to get the browning right.
Final thoughts
Without question the Roundboy Oven is a great investment in my home, more than anything I am having fun relearning the cooking archaeology that is a wood-fired oven.
Specs:
- Weight: Approx 1700 lbs.
- Length: 34.5″
- Width: 44.5″
- Height: 25″
- Internal working floor dimensions: approx 24″WX28″D
- MSRP: $1695
