The Ham Radio Guide: UV-5R CHIRP Programming
Travis Olander 01.25.23

The Baofeng UV-5R is one of the most popular entry-level Ham Radios on the market. It’s the handheld unit favored by most preppers, outdoorsmen/outdoorswomen, and generally anybody preparing for a “SHTF” scenario. But programming this versatile little radio can be confusing – unless you use the available PC software, CHIRP. So, today we will discuss UV-5R CHIRP programming. This is part 6 (the final part) of our multi-series guide to mastering the UV-5R and basic Ham Radio communications.
New To Ham Radio? Read Our Other Guides
- Part 1: Intro to Ham Radio and FAQs
- Part 2: Basic Radio Setup With a UV-5R
- Part 3: Navigating the UV-5R Menu
- Part 4: Basic Radio Programming (Frequencies and Channels)
- Part 5: Advanced Programming (Repeaters and Tones)
First, You’ll Need a USB Programming Cable
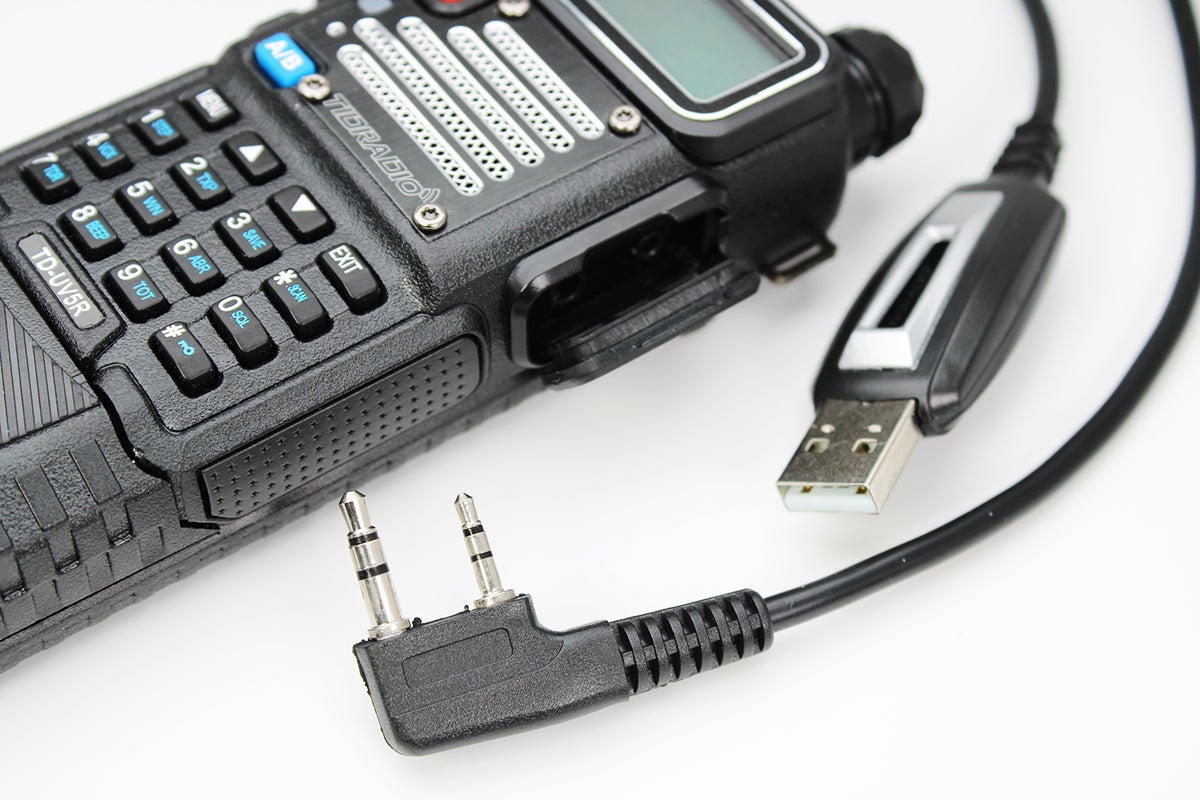
The pictured cable is a USB 2.0 connector with a proprietary AUX end. This adapter is made to fit the UV-5R, and its similar radio units. We strongly recommend purchasing directly from Baofeng. Authentic cables have a specific FTDI chip inside the adapter, which is required for ensuring your PC and its device drivers can communicate with the radio.
In some cases, UV-5R kits purchased online include this CHIRP connector. Once you have the cable, ensure it is firmly seated in the AUX ports on the right side of the radio, beneath the rubber cover.
Download and Install CHIRP
CHIRP is a free, open-source amateur radio programming software developed by Dan Smith. Besides the UV-5R, CHIRP can be used to program dozens of other radios.
On the “DanPlanet” website, click on the link labeled Download the latest CHIRP-daily build here:
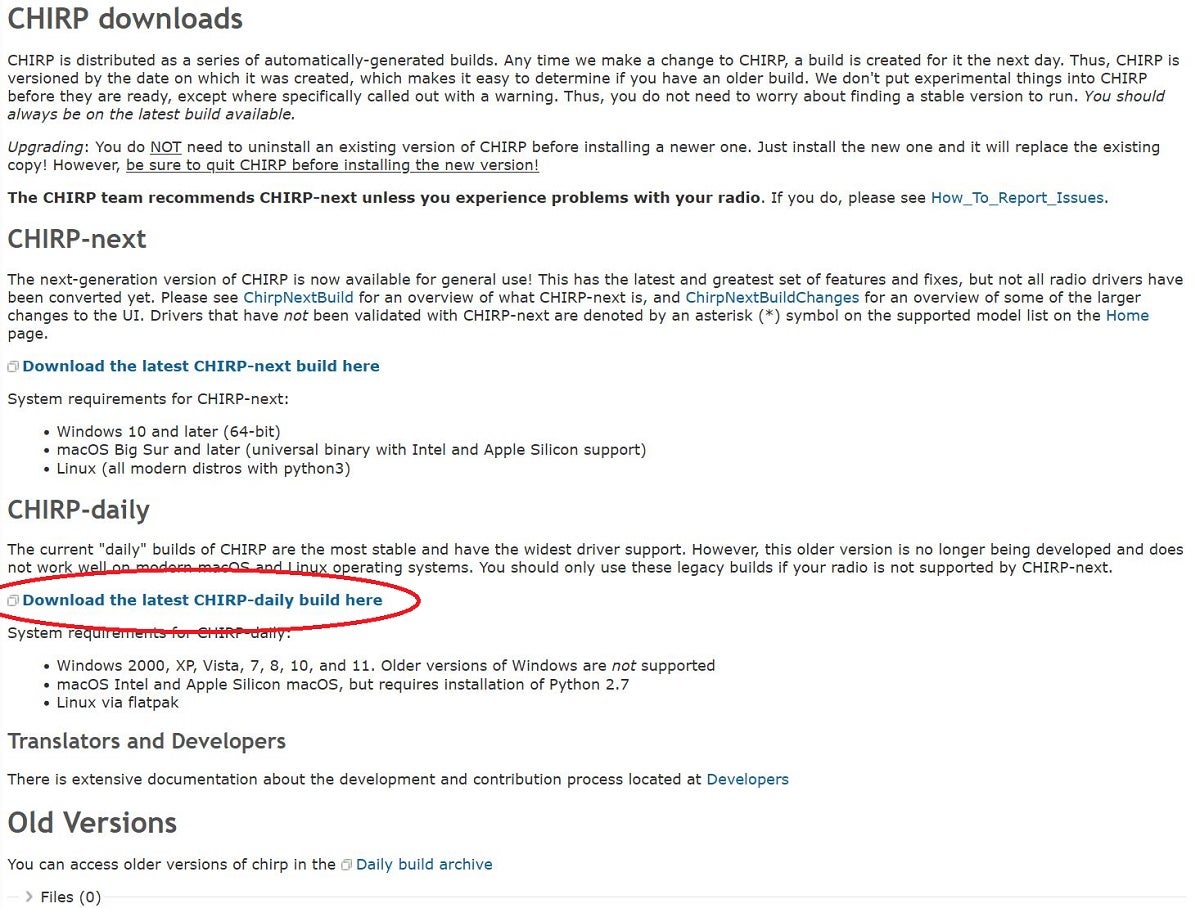
On the next page, download the chirp-daily-[date]-installer.exe file. This is the Windows Installer file for CHIRP. Once downloaded, run the executable, and follow the typical steps required for installing new software.
How to Run CHIRP
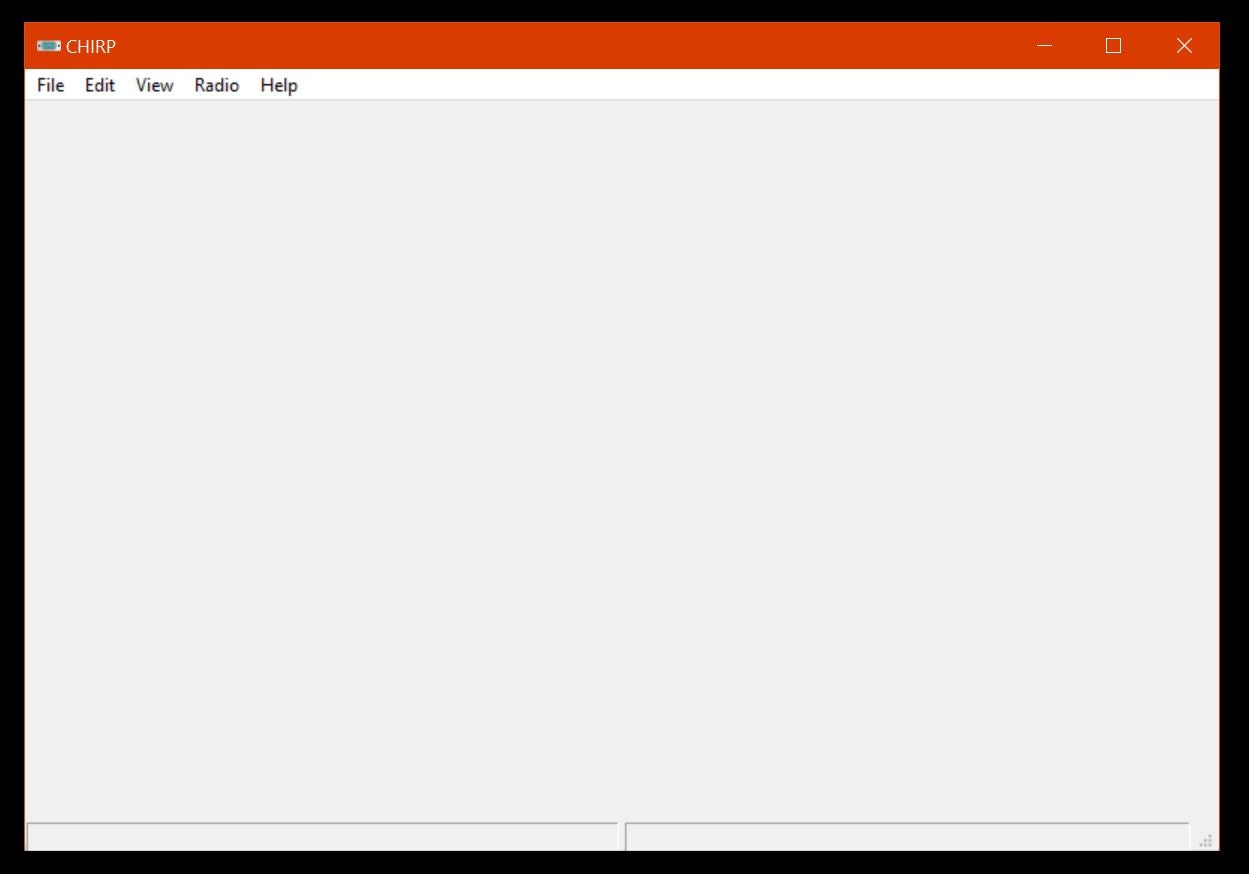
Once the installation has finished, run the CHIRP software. A desktop shortcut is not automatically created. You must navigate to the directory wherein you installed the software, and double-click the executable labelled chirpw.exe. The default installation directory is: C:\Program Files (x86)\CHIRP. Once the executable is ran, CHIRP will display a blank window:
At this point, you can connector your UV-5R to your PC via the FTDI cable.
UV-5R CHIRP: Getting CHIRP to Recognize Your UV-5R
Before using CHIRP, connect your FTDI cable to the radio while it is powered off. Plug the USB end into your PC. Then turn the radio on and remove the antenna.
NOTE: While programming your ham radio with CHIRP, the volume knob needs to be rest between 50% and 75%. Sub-audible tones are produced by the radio during programming. The CHIRP software must “hear” these tones for programming to work.
With a good connection, open CHIRP and navigate to the top-level menu labeled “Radio.”
Under “Radio,” select “Download From Radio.” A pop-up will display with the following drop-down menus: “Port,” “Vendor,” and “Model.”
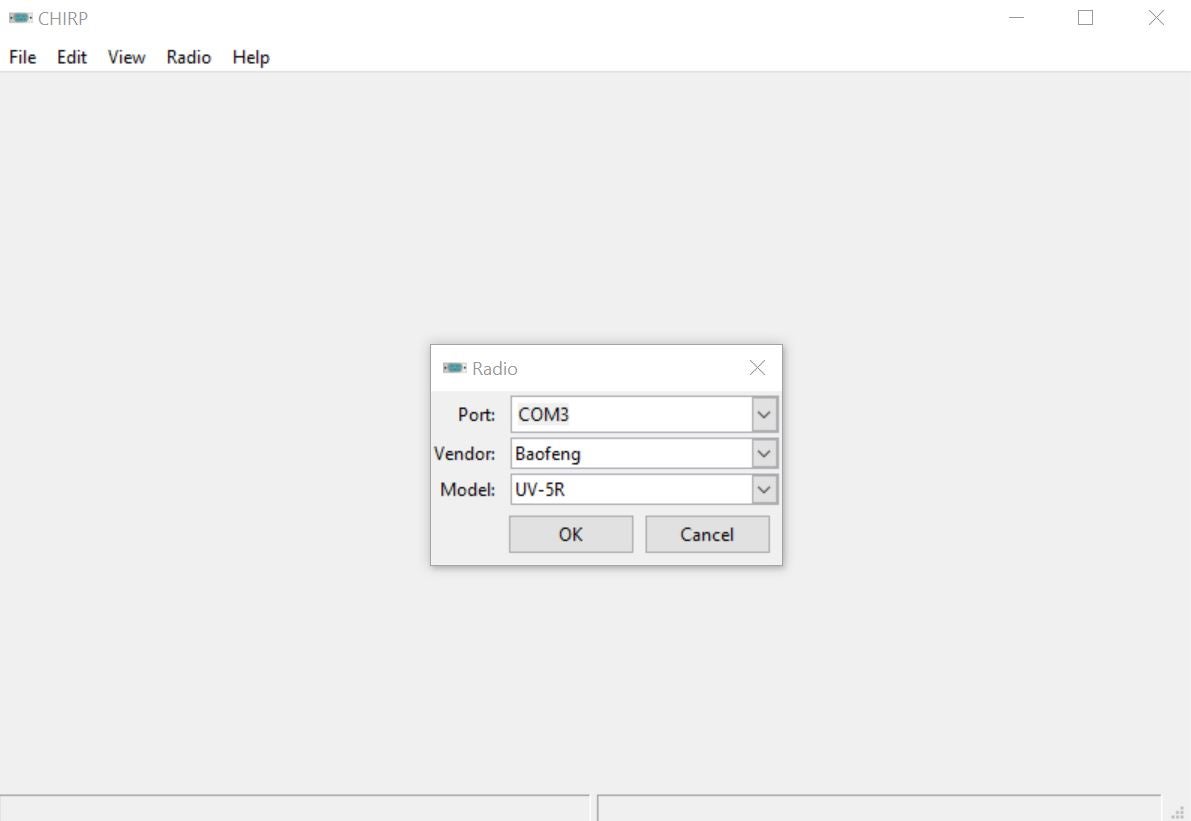
The “Port” menu should automatically detect your radio’s connection. This will typically display as “COM[number]”. Depending on the brand of cable you’re using, option may instead display as “usbserial,” or “UART.” If there is more than one COM port or option displayed, you will need test each one until you identify the correct port for your radio.
NOTE: If CHIRP doesn’t recognize your radio via the Port drop-down, you need to install the appropriate FTDI device drivers. They can be downloaded here.
- Under “Vendor,” select “Baofeng.”
- Under “Model,” select “UV-5R.”
- Hit “OK.” The radio will display a pop-up confirming your radio is appropriately connected.
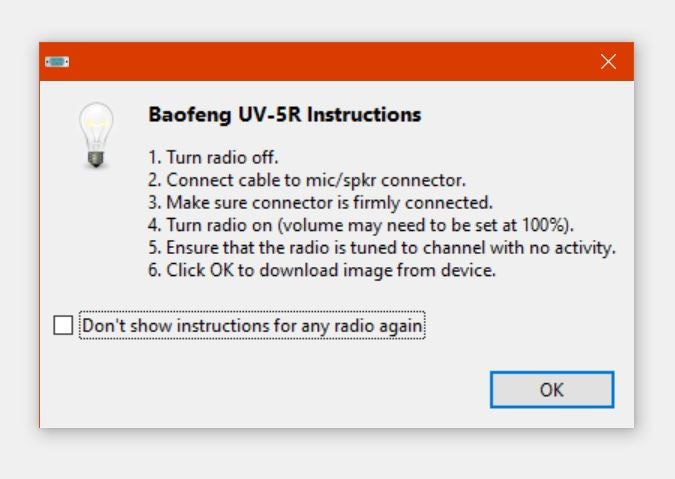
Click “OK” again.
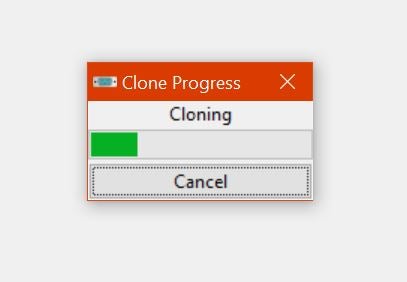
The software will begin cloning your radio’s existing data to display it in CHIRP. Once complete, the software will create a tab called “Baofeng UV-5R: (Untitled)*. This is your radio’s current configuration.
Each radio configuration CHIRP displays has two screens: “Memories,” which holds all stored channels and frequencies, and “Settings,” which governs your radio’s various menu functions.
NOTE: If you’re unfamiliar with the UV-5R’s menu options, read part 3 of this guide: Navigating the UV-5R Menu.
The CHIRP Memories Screen
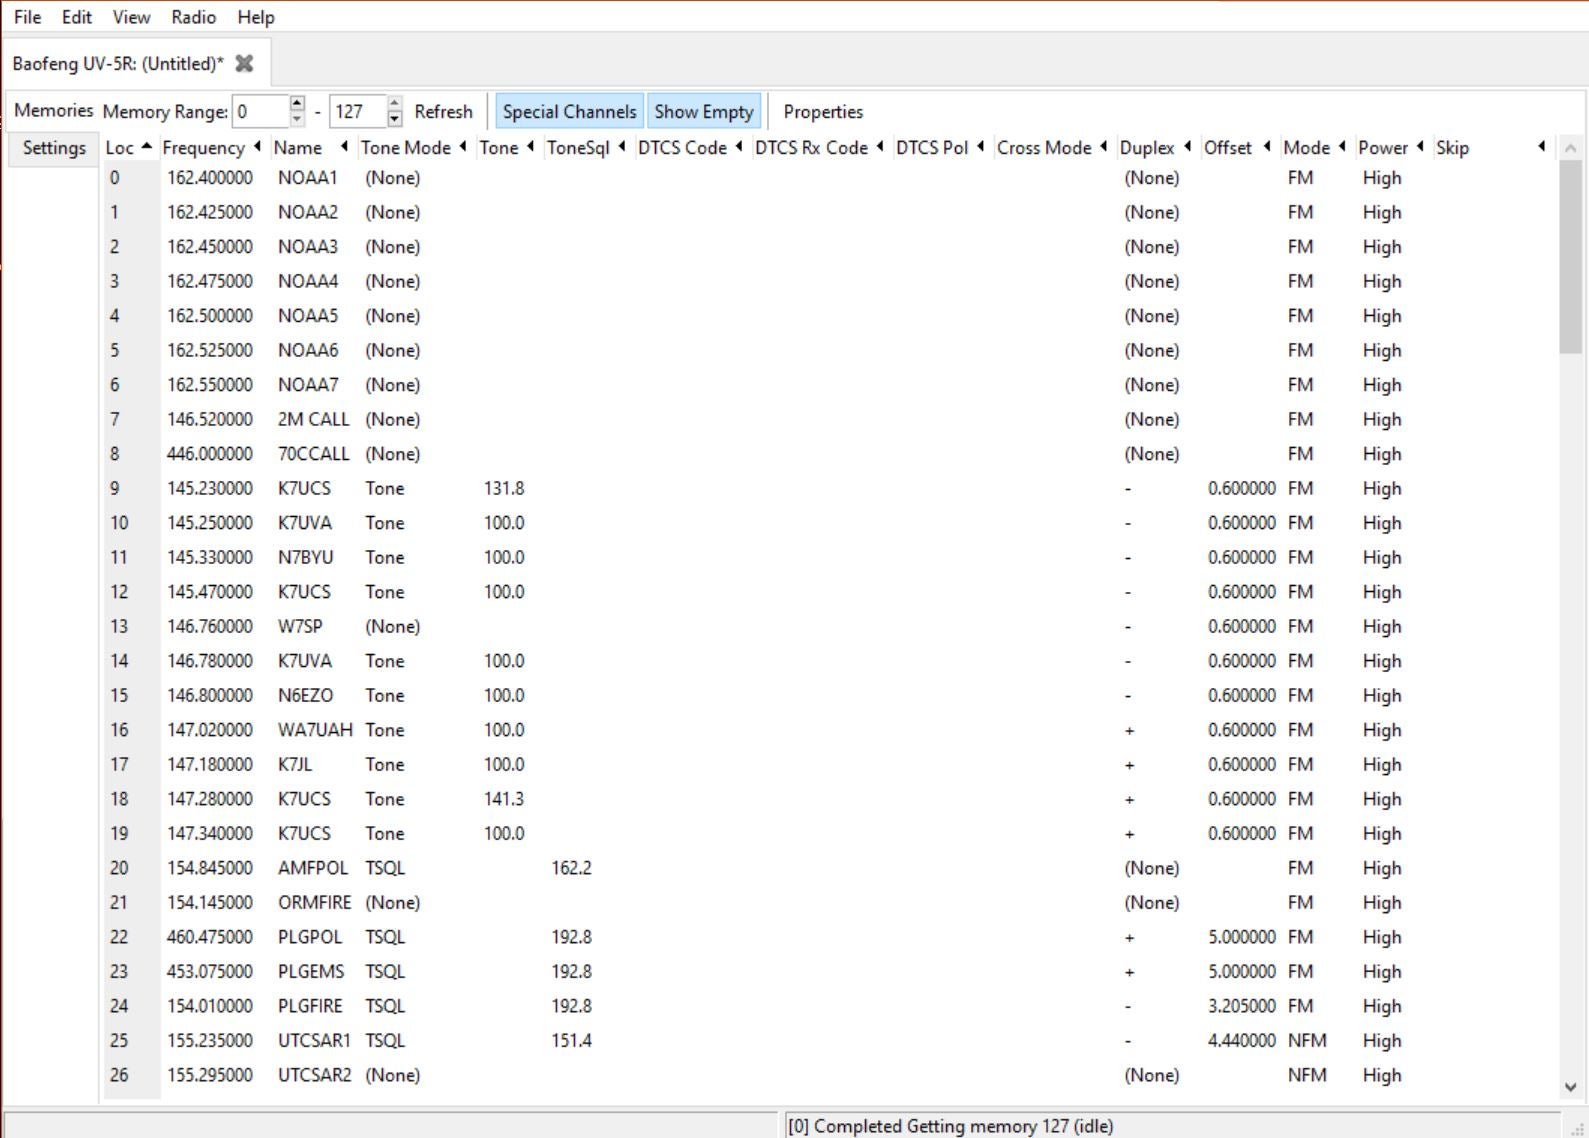
The Memories screen displays any channels you’ve already programmed. In this example, the radio has been configured with a few dozen local and national frequencies. This includes NOAA weather channels, broadly used “CALL” freqs, and various local repeaters that have pre-programmed with the necessary tones, codes, and offsets.
NOTE: If you’re unfamiliar with how to program repeaters, read part 5 of this guide: Advanced Programming (Repeaters and Tones). Although CHIRP largely takes care of programming these stations for you, it’s important to understand how repeaters function, so you can use them properly.
The Memories (channel) options include:
- Loc: The channel storing information. The UV-5R has 128 channels (0 to 127).
- Frequency: The channel’s frequency.
- Name: Custom names can be assigned to a channel. This can only be in CHIRP. The name can display up to six characters.
- Tone Mode: Used to program repeaters. This includes standard, TSQL, DTCS, and Cross tones.
- Tone: When a Tone is selected, only transmissions from that frequency (or repeater) also using that Tone will be received by your radio. If no Tone is selected, you will hear all transmissions from that frequency or repeater.
- Tone Squelch: This is the tone your radio must transmit to access a repeater to broadcast on it.
- DTCS Code. This is used to configure digital private line communications.
- DTCS Rx Code. Also used to configure digital private line communications.
- DTCS Pol. Sets the polarity of the signal on digital private line communications.
- Cross Mode. Used to convert one type of tone or code to another when configuring digital comms.
- Duplex: Used to set the polarity (plus or minus) of a repeater’s offset.
- Offset: Used to set the offset frequency of a repeater for use.
- Mode: Used to set a channel to narrow (NFM) or broadband (FM). Broadband should be used by default, although some pre-programmed repeaters use narrowband.
- Power: Determines the transmit power (High or Low) of the radio when broadcasting on that channel.
- Skip: Selecting “S” under Skip will cause the radio to skip that channel when scanning for broadcasts.
How to Program a Basic Simplex Channel in CHIRP
You can easily delete, override, and enter a new channel by clicking on each box within a channel’s row. For example, to program Channel 0, click on the “Frequency” column in that row, and enter the six-digit frequency you wish to save. Name the channel as desired (optional), and set the broadband, power, and skip settings as desired.
For simplex channels (radio-to-radio or “walkie talkie”-type comms), you do not need to enter any tones, codes, or offsets.
How to Program a Repeater in CHIRP
To program a repeater, you will need the frequency, tone, type of tone or code, and offset. Again, if you are unsure what these inputs mean, please read Part 5: Advanced Programming.
To easily acquire the info on local repeaters, you should find fellow ham operators. You can also use RadioReference.com (subscription required). Lastly, you can automatically pull repeater information directly into CHIRP from the internet.
To do this, select the option “Query Data Source” under the “Radio” menu in CHIRP. Select “Repeater Book,” then “Repeater Book Political Query.”
Next, select your state and county. Lastly, select the appropriate band for the UV-5R. This includes the 2-meter (144MHz) and 70-centimeter (440MHz) bands.
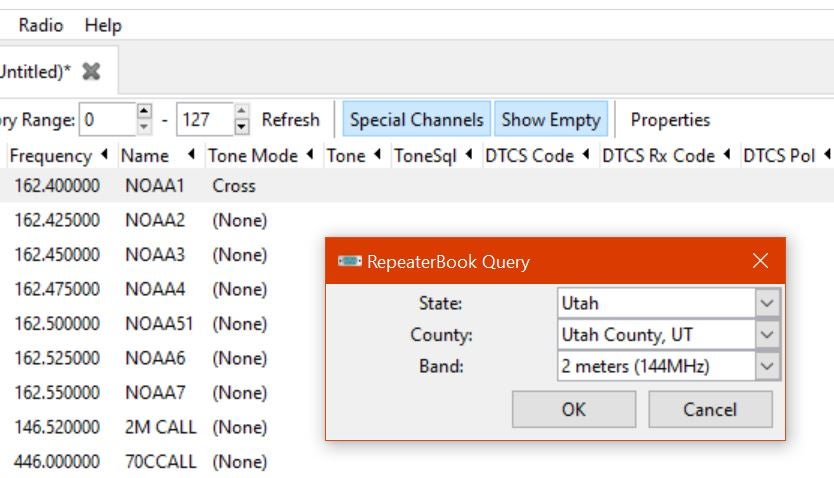
Click “OK,” and note the new tab created at the top of the CHIRP software. For this example (Utah county, Utah, 144MHz), we get a convenient, pre-programmed list of available ham repeaters.
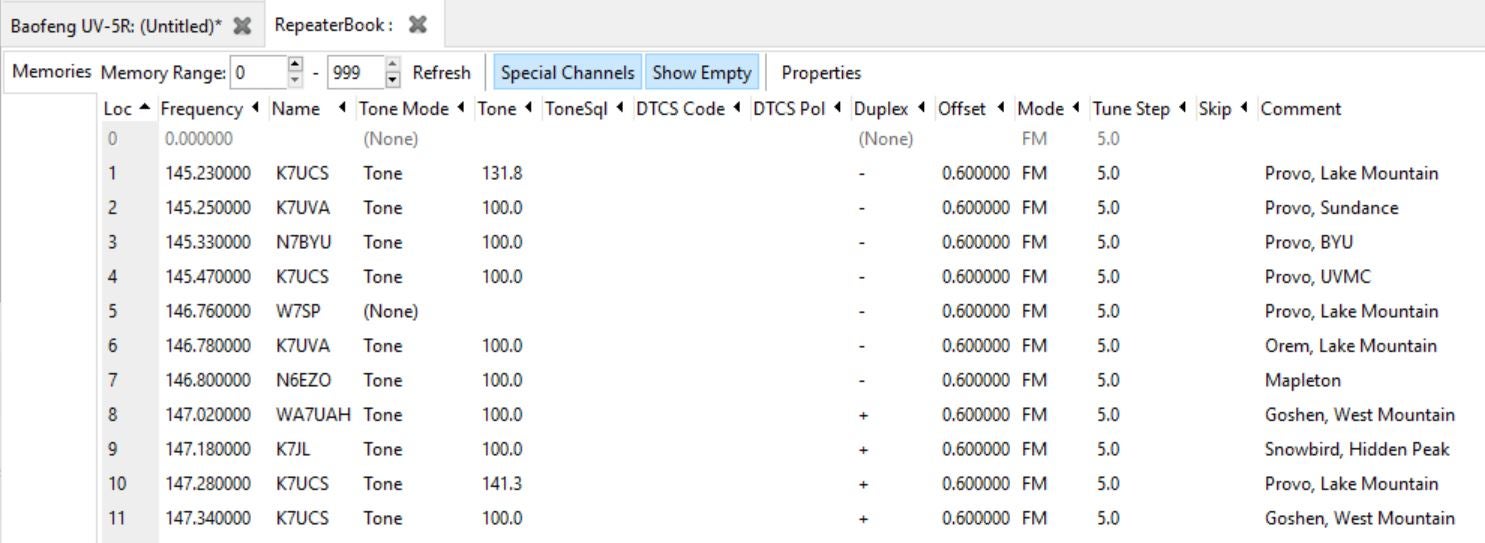
Each column already includes the necessary frequency, name, tones and codes, offset, and even comments describing each repeater antenna’s physical location.
To program your radio with any available repeater, simply click on the row you desire. Then right-click, and choose “Copy.”
Navigate back to your UV-5R’s tab at the top of the CHIRP interface. Select the channel (“Loc”) wherein you wish to save that repeater. Right-click that row, and click “Paste.”
That’s it! You’ve successfully entered a repeater on your UV-5R’s channel.
Modifying Radio Settings in CHIRP
Using CHIRP to set your UV-5R’s settings is much easier and less time-consuming. All 40 menu functions can be quickly accessed via the Settings tab.
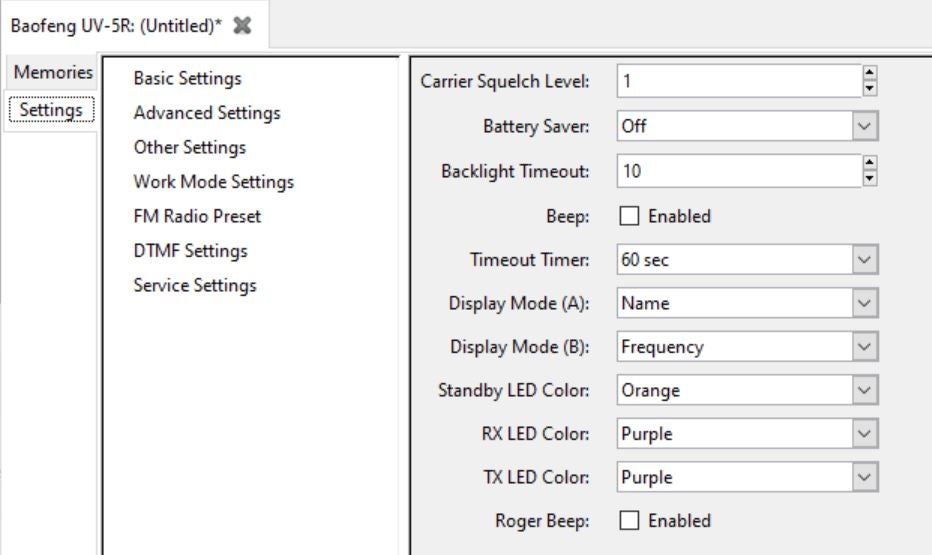
The radio’s settings are categorized into seven sub-menus:
Basic: Includes basic functions like the roger beep, screen color, and display timer.
Advanced: Includes settings for channel lock-out, squelch, scanning, and voice prompts.
Other: Here you can set custom power-on screen settings, and modify the radio’s frequency limits.
WARNING: The UV-5R is only designed to function between 136 and 174MHz (VHF) and 400MHz to 520 MHz (UHF). Attempting to send or receive outside these frequency ranges could damage your radio.
Work Mode: Includes settings that govern the main screen’s displayed channels.
FM Radio: Allows you to set the default FM radio frequency when enabled.
DTMF: Used to set PTT and ANI codes. These functions are outside the scope of this guide.
Service: Here you can manually set the amount of noise filtering provided by each numeric squelch setting that is found in the regular menu (0 to 9).
Saving Configurations & Updating Your Radio
You can save your radio’s existing or newly programmed configuration as a file on your desktop. This provides a useful back-up should you need to reset your radio, or program a new unit to function identically to an existing unit.
To do this, navigate to the “File” menu setting at the top of the CHIRP interface. Select “Save As,” and save your radio configuration file (.img) on your computer as desired.
IMPORTANT: This does not save the configuration to your radio.
To save your work to your radio, select “Radio,” then select “Upload to Radio.” Ensure the correct Port is selected. This is the same port identified when you first connected to CHIRP.
Click “OK,” then allow the “Cloning” progress bar to complete. Do not interrupt the process by handling the radio, or you could brick the onboard memory.
Once uploading is complete, the Cloning window will automatically disappear. You can now close CHIRP.
Turn off your radio before unplugging it from your PC. Power cycle the radio, then navigate the menu and channels to confirm your new configuration has been correctly uploaded.
